Friday, September 9, 2011

NYC

New York City is very dear to my heart. After Brian proposed on December 1, 2007, he immediately surprised me with a trip to NYC. The only catch? We were only going to be there for 12 hours so we could only pack what we could carry. And the reason for going? So I could ice skate in Central Park. As a little girl, I loved ice skating and I've always had this dream to ice skate in CP.
December 2, 2007

This was the first time either one of us had been to New York. That Christmas, Brian made me a promise that we would return to NYC before 2010 ended to spend more time discovering one of our favorite cities. If you know me and my love of traveling, well then you know I absolutely held him to that promise.

In 2010 we made plans for several trips, later coining it "The World Tour." NYC was the last stop of our world tour in December 2010. We agreed the trip would be our Christmas gift to one another.
December 7, 2010

Last October I had talked to our dear friend, Graham Yelton, about photographing our family. She kindly accepted and suggested a weekend in December, not knowing we would be in New York. I told her about our trip and asked if we could reschedule. Instead, she offered to come to NYC and photograph us running around the city. She'd developed this incredible story-line; we would literally be on the run in the city, hiding out. It was perfect. And so were her images.
Some of the images are featured in the current online issue of Modern Ink Mag. (Graham's beautiful home is featured as well.) Lyrics from Johnny Cash's Folsom Prison Blues tie the images together perfectly. Check it out.
http://moderninkmag.com/issues/issue-2-fall-2011/

I would like to extend a huge "thank you" to Graham and Modern Ink!

Friday, September 2, 2011

365

Earlier this week, Brian encouraged me to start a 365 project. For those living under a rock (like myself), a 365 project is a photo a day for...you guessed it...365 days. I'm going to use this next year to really push myself creatively and learn more about my camera. It's convenient that yesterday started a new month. [It makes my OCD-heart happy to begin this project at the beginning of a month.]

My dad is the head football [and basketball] coach at a local junior-high school. He's going on 34 years of coaching at the school and he truly loves every minute of it. It makes me so happy seeing him in his element and I couldn't be more proud. Home games are played at the high-school stadium only a couple of miles from our house so I stopped by his game on Thursday night. Here he is talking to his 8th grade team before their game begins. To me this is one of those iconic coaching moments. When I think of him as a coach, this image comes to mind - standing tall above his team as a leader, yet in the middle of them all, relating to them because he's been in their shoes before. I couldn't think of a better image to begin this project than of my dad, my hero.

Taken with Instagram

Keeping it in the Fam

I fall head-over-heels for all things vintage and I completely lose my mind if it has a "story". This chair was my uncle's (my mom's brother) as a child. He used it for completing schoolwork in their home office. My mom somehow inherited it along the way. And I asked if I could have it when I moved away to college. I spray painted the original black, metal legs and seat-back an off-white and covered the seat in a hideous, red toile fabric. It's been hanging out in our basement for the last couple of years so I thought it was time to give it some new life.

I stumbled upon this fabric a couple weeks ago (while looking for fabric for curtains in the living room-update on this soon) and figured 1/2 yard would be plenty since the chair is so small. The legs and seat-back got a fresh coat of spray paint - satin Hunter's White by Valspar. Two thin coats was all it needed because the new color was so similar to the off-white from several years ago. I let it dry overnight and then applied a thin top coat of clear gloss to prevent any chipping.


I used a staple gun to attach a thick layer of batting around the entire seat. Looking back, I wish I would have put more layers for extra padding/comfort. It looks much better (and it's easier to add the fabric) if the batting is pulled really tight around the seat. Remember to pull taut before each staple.


Because the print on this fabric is so large (and the seat is so small), I wanted to center it on the chair. I had several different options to work with because there are also different color variations along the fabric. After deciding on the placement, I cut the fabric - about two inches outside the border of the seat. Before stapling, I made sure to center fabric and double check after the first couple of staples, pulling taut each time. The only issue I had when recovering was adjusting the fabric around the metal "arms" on the seat-back. I actually cut the fabric and split it down the middle of each arm. And folded the fabric in a way that you couldn't see the frayed/cut edge, pulled each side tight and then stapled in place.

Sadly, I didn't take any before photos OR progress photos. But here's the finished product! I chose this fabric because I knew it could end up in several different places in the house and still work well with items I already own.

Cost breakdown:
  • Valspar spray paint (Lowe's): $4
  • Clear gloss spray paint (already owned): $0
  • Batting (borrowed from my mom): $0
  • 1/2 yard of fabric (King Cotton): $12
Total: $16

Friday, August 5, 2011

Blessing in Disguise

As customary around here - it's been a while since my last post. As some of you know, we had an F-2 tornado whip through our neighborhood the morning of the April 27 tornadoes that touched down in Alabama. Brian was out of town for work and I woke around 545 that Wednesday morning to what sounded like rhinos running along the roof, for lack of better explanation. Our quaint neighborhood is heavily shaded by tons of hundred-foot pine trees and the smallest thunderstorm can sound like the world is falling down on our house with small limbs and branches constantly hitting the house. But this storm was different. I’ve been known to fall asleep just about anywhere and sleep through just about anything. I never heard the sirens that morning and it wasn’t until a couple days later I realized I may have actually slept through the storm. A couple of brief moments passed after jumping and sitting straight up in bed, and then I heard the loudest “BOOM” I’ve ever heard in my life. Panic and anxiety immediately rushed in. The twelve hours that followed were a complete whirlwind. While many neighbor’s homes were destroyed, no one was hurt and for that I’m very thankful.


When we purchased this home in February 2009, we wanted to renovate the hallway bathroom but knew it would be quite some time before we could do so. Four days before the tornado, we agreed to “bite the bullet” and proceed with the renovation. Ironically the only place (other than the roof) in the house that suffered the most damage was the bathroom. Because of the water damage behind the drywall and tile, we had to gut the entire bathroom, allowing us me the opportunity to design my dream bathroom. The bathroom is to be completed next Friday. And I’m so excited to share all the photos and details with you.


This view is from our garage door looking down our driveway. (Two HUGE pine trees were on the ground to the right of this photo. These are the limbs from one of those trees.)


This is our driveway after my dad and mom helped me clear it. Only took 10 hours.


This photo doesn't do it justice, but these pine trees are huge. These are the two I mentioned earlier. Our bedroom is the back window in the photo - where I was asleep.


The backyard


Brian's music trailer/storage completely crushed. None of his equipment was damaged.


I love this one of Solo playing on one of the trees.

Sunday, April 17, 2011

Freezer Spring Cleaning

I've spent the afternoon going through our freezers. Yes, freezers! In addition to the freezer in our fridge, we also have a deep freezer that lives in the garage. It's great for storing TONS of food. I hate wasting food, so I've been going through everything. Throwing away things that have been in there for years (yikes!) and trying to come up with meals for the week using foods that are still acceptable. I had some questions about a couple of things, like how long is too long to freeze raw chicken? And I stumbled upon this article from RealSimple. It's a great reference to have when cleaning out your freezer. Enjoy!

Friday, February 4, 2011

second look

I'm not sure if you caught it, but the kitchen cabinets (from yesterday's post) are two different colors. I was hoping the finished product would be more dramatic, but I really like how subtle the transition turned out. All the cabinets above the countertops are painted Swiss Coffee by Benjamin Moore and all the cabinets below are painted Hazy Skies, also by Benjamin Moore. We had a special lacquer paint mixed in order to create a seamless finish.
Just thought you might want to take a second look...

My inspiration came from one of my favorite sites design*sponge.

after

As promised, here's photos of the finished product. Keep in mind the interior design is nowhere near complete, but it's a start. You'll find a complete list of resources at the end.

View from front door looking into entryway (living room to the right)

View from entryway looking into living room

View from living room looking into dinging room

View from back of dining room looking into kitchen

View of kitchen with new cabinets and retro chandelier

View from kitchen looking into living room and entryway to the right

Storage under the bar

Kitchen

Dining Room Chandelier

:: RESOURCES ::
Wall Color - Benjamin Moore, Hazy Skies
Trim and Moulding - Benjamin Moore, Swiss Coffee
Entryway table - Scott's Antique Market, Atlanta
Coral - Beach Dwelling
Bar lights - At Home
Barstools - borrowed from a friend (I ordered 3 wooden/metal stools back in November and I'm still waiting for them to come in)
Chalkboard - antique window, chalkboard paint
Coffee table - Blue Ocean Trader
Rug - (temporary, one I want has been ordered) Dash and Albert
Dining room table - Broyhill
Chairs - Four Hands
Chandelier - Pottery Barn and pages from an antique French cookbook
Frames - Scott's Antique Market, Atlanta
"EAT" letters - Urban Outfitters
Starfish - Pottery Barn
Fridge - GE Profile
Dishwasher - Whirlpool
Rug - Martha Stewart
Hand towel (on fridge) - Martha Stewart
Kitchen fixtures and shades - School House Electric
Trash can - Simple Human
Drawer pulls - Restoration Hardware
Cabinet pulls - Home Depot
Countertops - AWP Butcher Block
Clock above bar - Restoration Hardware
Baskets - Target
Canisters - antique
Hand towel (on oven) - Cat Studio

Thursday, February 3, 2011

time flies

Wow. Where did the time go?! It's been over a year since my last post. Lately, I've been really inspired and have a lot of things to share, so welcome back!

In September 2009, after living in our house for only 7 months, we decided to renovate our kitchen, living, and dining rooms. We completed the project 3 months later, December 2009. And I just realized I never posted photos. The interior design is still a work-in-progress and I'm afraid it will be for a while. But I'm okay with that. I want to make smart decisions about the pieces of furniture we do buy. I think it's important to choose wisely. Not only do I want each piece to tell a story, but I want our furniture to be with us for years to come...timeless.

Today I leave you with photos of the before. Tomorrow's post will feature the AFTER.

View from front door looking into entryway (living room to the right)

View from entryway looking into living room

View from living room looking into dining room

View from back of dining room looking into kitchen

View of kitchen with retro cabinets and vintage chandelier

View from kitchen looking into living room and entryway to the right

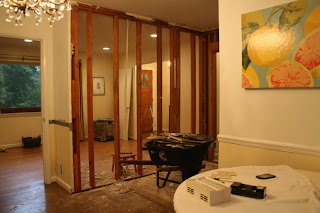
Day one of demolition :: view from entryway into living room

Demolition :: view from dining room into living room

Header installed :: view from dining room into living room

Monday, November 9, 2009

still here

I'm sure you've noticed the blogging has been non-existent lately. Brian and I both have full-time jobs as well as a job that doesn't put food on the table (renovating this house). When we're not being paid, we're either running to Home Depot or using the air compressor to nail molding to the wall or spray paint our cabinets. So you can see why the blog has taken a back seat. Don't worry, we're still here, still working.

This past week has been a roller coaster. Brian has attempted to spray paint our cabinets with ZERO success. It has eaten up TONS of our time, patience, and energy. So we have a cabinetmaker coming to look at the cabinets tomorrow. We're so anxious to meet our deadline (Thanksgiving) that we're willing to pay someone to finish the paint. These cabinets have caused Brian the biggest headache thus far in the reno (more details to come on the cabinet project later). Brian had to work without me this past weekend because I spent most of it on the couch or in bed suffering from a sinus infection.

Just wanted to let you know we're still here. And hopefully I'll have some updates/projects in the next couple of days. Good night!

Thursday, October 29, 2009

Deana's Appliance Dilemma

A friend and former colleague from my days at Coastal Living magazine sent me a message the other day with some questions about our appliances. I never responded to her personally so I thought I'd go ahead and answer her questions here. Deana sent the following...

The more I look at your kitchen renovation pictures, the more your kitchen looks exactly like ours that we are renovating - same exact layout! I have a question - what did you guys decide to do about your oven/stove/microwave/hood? We are so undecided about whether to get one of those oven/stove combo-units where the stove is, hanging the microwave over the stove, or replace them separately and put in a cool new hood in place of the cabinet over the stove. Just curious what you guys are doing since your kitchen looks exactly like ours! We're also going to be refacing the existing cabinets with new doors and paint - it is neat to see your progress and see what we have in store for us!

Here's a photo of our kitchen so you can see where all the appliances are located.


Great questions, Deana! The oven, stove, microwave, dishwasher topic has been one of our biggest topics of discussion. When the renovation originally began we had ZERO intentions of changing anything in the kitchen. It only took a couple of hours after knocking down that first wall until we were asking ourselves, "What if the cabinets were a different color?, What if we had new cabinets made?, Do we have enough money for new appliances?" We still are not 100% sure about some of the appliances, but I'll tell you our plan so far. I'll give you the "practical plan" and the "wishful thinking plan". The oven/microwave area has been a challenge because the area it's currently in can only occupy a 24" unit. We've had trouble finding units this small because no one really makes them anymore (because our house was built in 1958). This oven by GE seems to be the best match for our practical budget. (Our fridge is stainless steel so we'd like for all our other appliances to match.) And we'll probably store the microwave on a shelf above the wall oven. If the sky was the limit, I'd actually look into making the opening larger and buying something like this 30" GE Profile microwave/oven combo. We've also considered a double oven wall unit but I can't ever see myself using 2 ovens at the same time. I found this one to be reasonably priced.

Again, if our money tree would bloom, we'd actually remove the cabinet space that's currently under the stove and put in a stove/double oven. But for now, we'll leave the stovetop alone. It's connected to a gas line and I've never had any problems with it. We currently have a vent hood by NuTone that the previous owners installed. It's in great working condition so it won't be replaced either.

We hadn't really planned on replacing the dishwasher...until tonight! (Brian began priming our cabinets with a spray gun tonight so we thought it'd be wise to remove the dishwasher.) The copper line was welded to the dishwasher and the only way to move it, was to cut the line. We cut off the main water line and when Brian cut the copper line, water went everywhere! All we have to do is replace the copper line and it'll be fine, but it's also a great excuse for a new dishwasher! Brian suggested it and there's no way I could turn that offer down! I'm completely obsessed with a company called Big Chill. They make custom, RETRO fridges and dishwashers (and soon stoves) that are pure eye candy. If I can convince Brian, we'll be saying hello to this guy. I really want the white color.

Deana, I hope this answered your questions. I'll try to keep you posted on any final decisions and of course will post photos ASAP. Please keep me posted on your progress too and send photos!

Wednesday, October 28, 2009

pumpkins and chairs, oh my!

Hi. Court here. Sorry I've been MIA for the past several days; I've been out of town since last Friday. Brian and I decided to take a spontaneous vacation to the beach with our good friends Tullie and Sami Jo. We left Friday afternoon and returned home late Sunday night. SJ and I ended up carving pumpkins on the beach and here's how they turned out...

I (of course) carved an owl pumpkin. Brian helped by drawing the design.


On Tuesday I spent the day in Atlanta at market with my sis-in-law (Brandi) and my mother-in-law (Annette). It was great to spend time with them while also searching for discounted furniture. Dining room chairs are a huge priority right now, but the ones I want are $250/chair and I need 6 so that = LOTS of money. I wasn't really expecting to find anything at market, but I came across this at the first place we stopped...

They're extremely similar to the ones I want, but even better, they're $65/chair! Wow! What a deal! We keep shopping and tucked in the back of the store I find this sweet surprise...

The chairs I REALLY want! And guess what?! These are also $65/chair. So I decide to order them and sad news - they only have ONE left in stock! They're going to call me if any more come in, but if they don't I may end up ordering the first ones I found. It's such a great deal; just don't think I can pass this one up. I'll keep you posted on which ones we go with.

Wednesday, October 21, 2009

The Fun Part

We're slowly but surely making our way to what I like to call the "fun part", where I get to pick out paint colors, lighting fixtures, furniture, accessories, etc. Yesterday I ordered our dining room chandelier and the custom countertop for the breakfast bar. I came close to ordering the chandelier several weeks ago but decided to wait and I'm so glad I did. I constantly get e-mail updates from Pottery Barn and I received one on Monday saying all of their chandeliers were on sale! Score! It was only $50 off, but hey, it's $50. And, double bonus- I had $75 in gift cards that I've been holding onto since our wedding (yes, it was 1.5 years ago). But I'm a pack rat and keep everything. Brian thinks it's a sick disease.


The countertop came from a company out of Kentucky called AWP Butcher Block. Our existing countertops in the kitchen are a finished hard rock maple and they're one of the first things I fell in love with when we first saw the house. So I really wanted to find a countertop for the bar that would match the rest of the kitchen. AWP quoted us a great price (the cheapest of all we researched) and they've been super-nice and friendly every time Brian calls with more questions.

Existing countertop

Tuesday, October 20, 2009

Getting Started

Hi. Courtney here. Brian and I have started a LOT of projects around our first home and I've been looking for an economical way to document it all. For those of you that know me well, you know I love to scrapbook everything. I wanted a way to share our renovation "scrapbook" with all of you. So a blog was born. This blog is going to document our journey of renovating our house. I really do hope to provide words of wisdom and advice along the way - on how to save money by doing things yourself. We've only been at this for a couple of months, but we've learned so much already. And I know there's so much more to come. So here you go, our renovation joys (and stresses too) documented just for you.

You might be asking yourself how we got started? Well, it all began with Taco Tuesday, a weekly tradition at the Authement house. One of our friends is an architect so we began inviting him over for tacos and wine just to throw around the idea of knocking down some walls. Just to give you a little background on our house...it was built in 1958 and is a typical ranch-style home. Most of the rooms are small and don't flow very well. And our original thought was to knock down the wall between our living room (at the front of the house) and the kitchen (on the back of the house) and install some sort of breakfast bar in between the two rooms. Over the past several months our ideas and drawings have grown into something much bigger. So what began as something fun to talk about is now a living, breathing renovation.

Meet our House (this was taken the day we decided to make an offer)


BEFORE: The view from the front door, looking into the living room


AFTER: Same view